Shailen Tuli's blog

Thoughts on coding in Dart, Ruby, Python and Javascript

A First App With Web Components Using Dart and Web UI Library

| Comments

Its time to finally create a simple hello world app using web components and the dart Web UI library.

There is already a ton of literature out there on why web components are a tremendously good idea and I won’t try to do a huge ‘sell’ here. If you are completely new to web components, I can recommend this really good introductory blog post by Seth Ladd

Or, if you are impatient, here’s an (almost) tweet sized summary: web components allow developers to encapsulate their UI elements as easily reusable components. You can define templates with markup that is inert until activated later, apply decorators to enhance the look of those templates, create custom elements and play with the shadow DOM. In this little app, we will not be tikering with decorators or the shadow DOM; we will be creating templates and defining our own custom element.

The app is called bookstore and you can find the code at https://github.com/shailen/bookstore.

Since I am new to web components and the Dart Web UI library, I am going to keep this simple. In its current iteration, the app will show the user the list of books in the bookstore and let the user add books to the collection. The plan is to start with something minimal and over the next few weeks and months build something a little bit elaborate (add Authors, Publishers, more attributes to our Book class, reviews, etc) while preserving the one-page feel of the app.

Important Files

There are a few important files in bookstore’s web directory that are worth discussing now:

lib/models.dart contains code for a Book class

web/books.html contains the basic markup for the app

web/books.dart contains the Dart code that goes with that markup

web/book_component.html contains the markup for our web component

web/book_component.dart contains the Dart code for our web component

build.dart helps use compile our code so that it can be run

We’ll discuss each of these files in detail soon.

lib/models.dart

We’re going to be creating books. This file defines a simple Book class. Our books only have 1 attribute for now, a title (I told you this was simple ;).

library models;

class Book {
  String title;
  Book(this.title);
}

web/books.html

Here is the entirety of teh web/books.html file. Consider this an entry point into the app:

<!DOCTYPE html>
<html>
  <head>
    <meta charset="utf-8">
    <title>Books</title>
    <link rel="components" href="book_component.html">
  </head>
  <body>
    <h1>Books</h1>

    <input id="new-book" type="text" placeholder="add another title">
    <button on-click="createNewBook()">Add Book</button>

    <ul id="books">
      <template iterate="book in books">
        <x-book-item book="{{ book }}"></x-book-item>
      </template>
    </ul>

    <!-- this is the non web-component way to create the <li>s
    <ul>
      <template iterate='book in books'>
        <li>{{ book.title }}</li>
      </template>
    </ul>
    -->

    <script type="application/dart" src="books.dart"></script>
    <script type="text/javascript" src="https://dart.googlecode.com/svn/branches/bleeding_edge/dart/client/dart.js"></script>

  </body>
</html>

A few things to notice here:

<link rel="components" href="book_component.html">

is the way you access the contents of our web component from this file.

We create an input where the user enters the name of a book and an accompanying button:

<input id="new-book" type="text" placeholder="add another title">
<button on-click="createNewBook()">Add Book</button>

Notice the on-click? That is the way we inline an event listener: when the button is clicked, createNewBook() fires (we’ll get to that function soon)

And finally the code that actually deals with the web component:

<ul id="books">
  <template iterate="book in books">
    <x-book-item book="{{ book }}"></x-book-item>
  </template>
</ul>

A few things to note here. We define a <template> tag; we loop over our collection of books (stored in a variable books in web/books.dart); we instantiate our web component (<x-book-item></x-book-item>) and we pass each book in the loop as a template variable when we instantiate the web component.

There’s a lot going on here. Make sure you understand the above paragraph!

web/books.dart

web/books.html has a link to a Dart file at the bottom:

<script type="application/dart" src="books.dart"></script>

And here is what books.dart looks like:

import 'dart:html';
import 'package:bookstore/models.dart';

List<Book> books = [];

// binding created auto-magically!
void createNewBook() {
  var input = query("#new-book");
  books.add(new Book(input.value));
  input.value = "";
}

main() {
  // create some data so the page doesn't look empty
  ["War and Peace", "The Idiot", "Crime and Punishment"].forEach((title) {
    books.add(new Book(title));
  });
} 

It is pretty straightforward stuff: we import models.dart, the file that contains the Book class; we create a books variable to store our collection. We define createNewBook() to add a book to books, and we define a main() function.

This Dart file MUST contain a main(), even an empty one will do. In our case, we will add a few books to our books collection, so that there is some data to display.

web/book_component.html

This contains the code that defines our web component:

<!DOCTYPE html>
<html>
  <body>
    <element name="x-book-item" constructor="BookComponent" extends="li">
      <template> 
        <li>{{ book.title }}</li>
      </template>

      <script type="application/dart" src="book_component.dart"></script>
    </element>
  </body>
</html>

A few things to understand here: we create a custom <element>; we give it a name, x-book-item (all element names must begin with an x-); we call a constructor, BookComponent (defined in web/book_componenet.dart, we’ll get to that file shortly) and we declare that our custom element extends and li.

Inside our <element>, we create a <template> that stores the <li> that contains a book’s title.

And finally, we link to the accompanying Dart file, book_component.dart.

web/book_component.dart

Here we get to define our BookComponent class (remember that we declared that the <element> we created in book_componenet.html use this constructor?):

import 'package:web_ui/web_ui.dart';
import 'package:bookstore/models.dart';

class BookComponent extends WebComponent {
  Book book;
}

BookComponent extends WebComponent (this is the only option for subclassing at the moment; that may change in the future) and contains a book attribute (this can be set using the book = syntax when the web component is initialized). That’s it.

build.dart

import 'package:web_ui/component_build.dart';
import 'dart:io';

void main() {
  build(new Options().arguments, ['web/books.html']);
}

To actually build the project, run build.dart (this will create an out directory); then run web/out/books.html.

pubspec.yaml

The app only has a single pub dependency, web_ui:

name: bookstore
description: A sample app to demonstrate the use of a web component

dependencies:
    web_ui

Summary

This is a fair bit of code for a simple hello-world caliber app. Is all this web component stuff really necessary, or is it overkill?

We’re just starting out, so this may seem like too much of a production given what the needs of our app. But we have already established a pretty important development principle: our UI elements can be nicely ENCAPSULATED (!) and then used as necessary. We have taken the first baby steps towards creating a widget that displays the content of each book. As our application grows in complexity, our ‘widget’ will become more elaborate and we will want to use it in all sorts of different contexts in our app. A composable, encapsulated UI component - a web component - that can be instantiated with varying arguments will then prove to be quite useful.
Setting Up Continuous Integration for Dart Using drone.io

| Comments

Creating a dummy project

I created a very simple project, droneDemo, to show how to set up Continuous Integration on drone.io for Dart projects. The code can be found here on Github.

droneDemo defines just two methods, add() and multiply(). These can be found in lib/. Tests for these methods can be found in test/. The pubspec.yaml file needs to declare a unittest dependency for these tests to work.

This is about as simple a project as you can have and there is little need for explanation. But it is worth delving into 2 points:

1) You should add packages to your .gitignore. This is to tell git not to commit the symlinks created by pub to version control. These symlinks are meaningful in the context of your filesystem but will trip drone.io.

If you already started your demo project and ended up with the symlinks, remove them.

2) drone.io needs a way to run all your tests. So far, Dart does not ship with a test runner, so you’ll have to cobble together something yourself.

Here’s what I did: my tests live in 2 different files, test/add_test.dart and test/multiply_test.dart. I declared both files as libraries (see the library add_test; and the library multiply_test; declaration at the top of each file) and imported components from them into test/test_runner.dart.

import “package:unittest/unittest.dart”; import “add_test.dart” as add_test; import “multiply_test.dart” as multiply_test;

void main() {

 add_test.main();
 multiply_test.main();

}

So, calling dart test/add_test.dart or dart test/multiply_test.dart runs only one test; calling dart/test_runner.dart runs both the tests.

With this out of the way, we can shift our attention to drone.io.

Drone.io: Basic Setup

Set up account at https://drone.io/signup.

On your dashboard, click on the New Project on the top right.

Pick Dart as the project language.

Pick Git as your Repository type.

Add the project name (I added droneDemo).

Add the Repository URL (mine was https://github.com/shailen/droneDemo.git). Make sure your github repo is set to use the http method, not the ssh method.

Press Create.

Configuring your Build

After you press Create, you will be redirected to the script/config page. Here, you will have to tell drone.io how to run your tests.

In the Commands section, type the following:

pub install
dart test/test_runner.dart

Remember test/test_runner.dart was our consolidating test runner? This is where the trouble we went through sewing our tests together pays off.

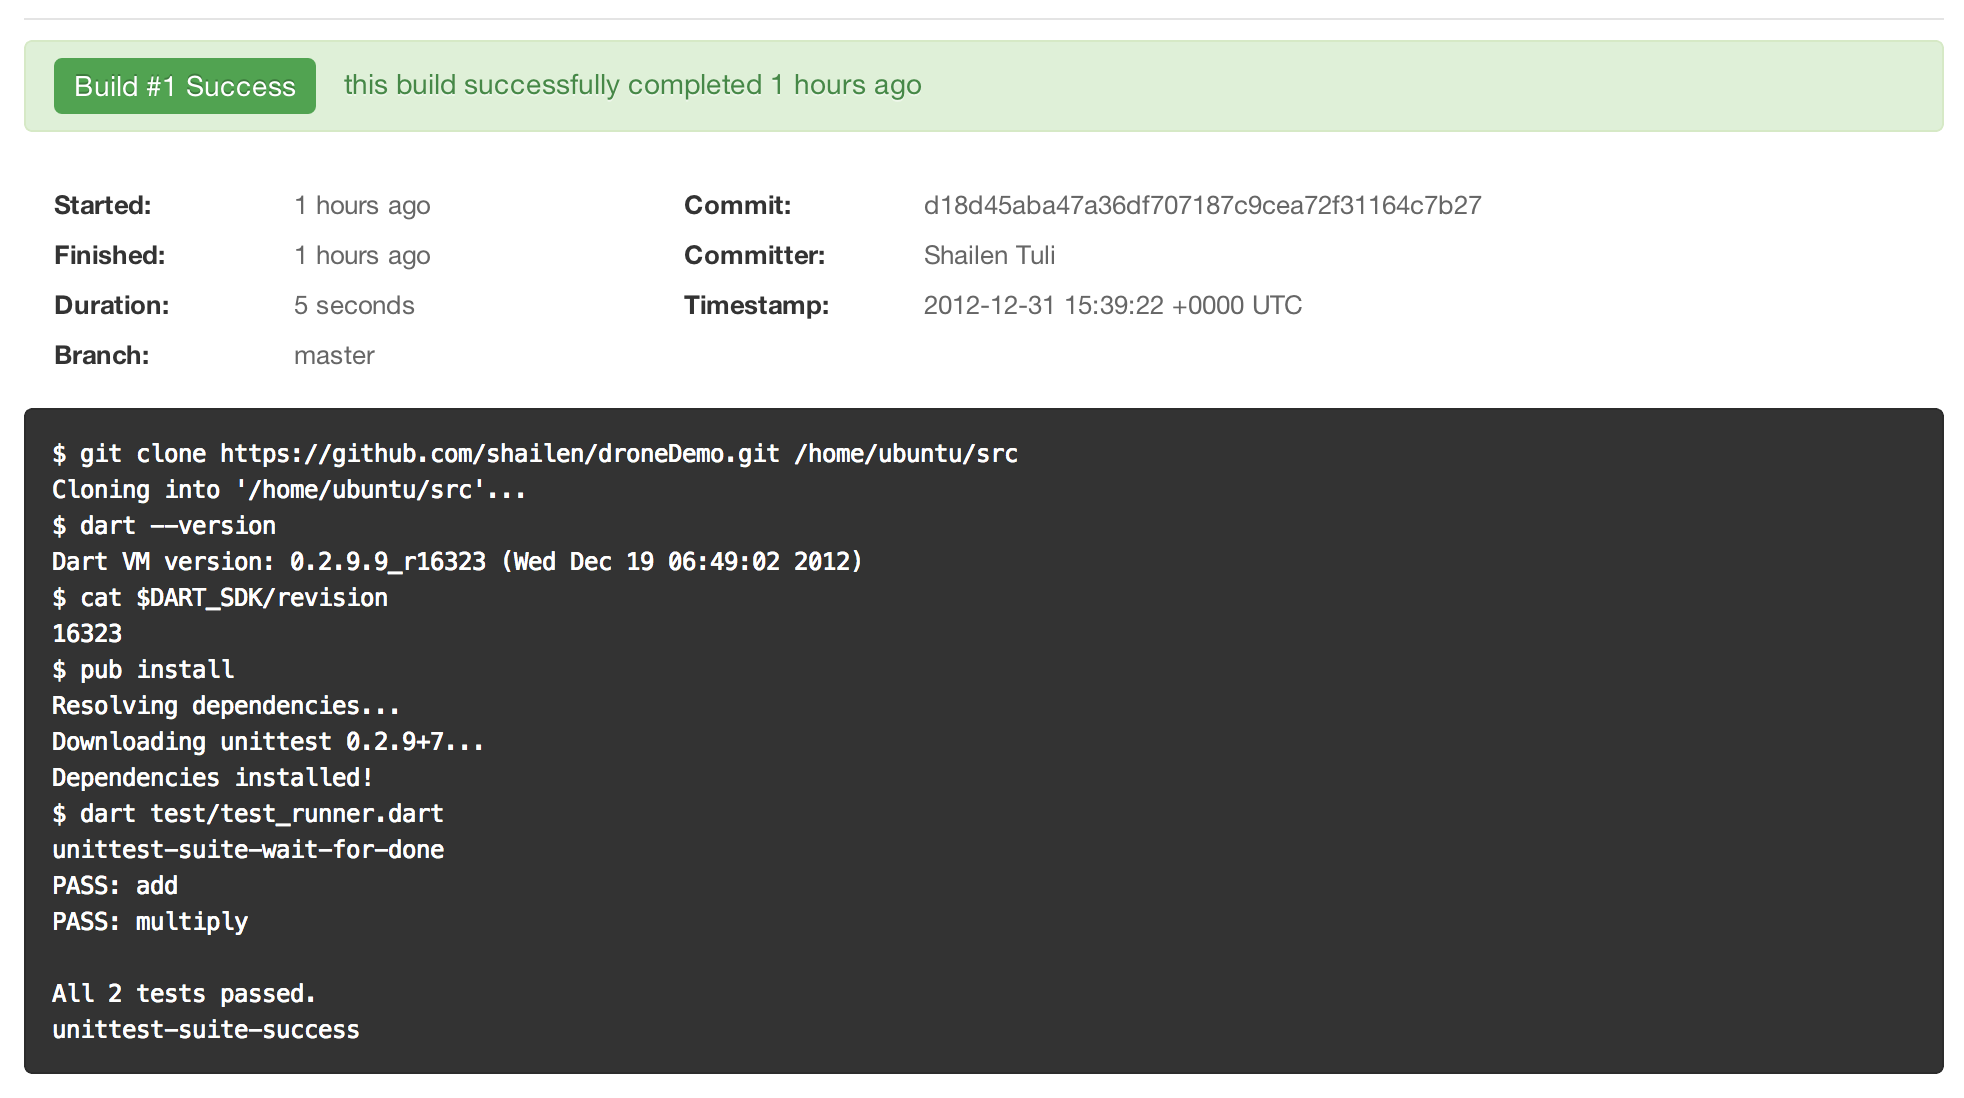
Press Save and when you get the message that tells you the build was successfully saved, press the blue Build Now button at the top.

A popup will appear with a Build Output link. Click that link.

Voila! You are swimming in a sea of green!

My build output can be seen at: https://drone.io/shailen/droneDemo/1

Setting up Continuous Build

Click on settings for your drone.io project

Click on General in the left column. You will see a couple of links under Build Hooks. Copy the top one.

Now, go back to your project on github. Mine is at https://github.com/shailen/droneDemo.

Click on Settings.

Click on Service Hooks (left column).

Click on the WebHook Urls link at the top.

Paste the build hook you had copied earlier in the text input box provided and press Update Settings.

From now on, every time you commit to your project on github, drone.io will run all your tests.

I changed one of my tests so that it was failing and pushed to github. No surprise, the build now show Failed (https://drone.io/shailen/droneDemo).

Randomness in Dart: nextBool(), nextInt(), and nextDouble()

| Comments

The Random class in dart:math contains 3 methods, nextBool(), nextInt() and nextDouble(). To use Random, you will need a import 'dart:math in your code.

nextBool()

simply returns true or false at random. Here is a little function, randUpcase() that demonstrates randBool() use. randUpcase() takes a string as an argument, and converts each character in the string to uppercase if random.nextBool() is true and leaves it untouched if it is false.

String randUpcase(String s) {
  Random random = new Random();
  List<String> chars = s.split('');
  return Strings.join(chars.map(
    (char) => random.nextBool() ? char.toUpperCase() : char), '');
}

And here is some sample usage:

var herbs = ["parsley", "sage", "rosemary", "thyme"];
print(herbs.map((herb) => randUpcase(herb))); // [pARslEY, SaGE, roSEMaRY, tHYME]

nextInt()

takes a max int argument and generates a positive int between 0 (inclusive) and max, exclusive.

To generate a random int within a range, you can do something like this:

int randRange(int min, int max) {
  var random = new Random();
  return min + random.nextInt(max - min);
}

You can also use nextInt() to randomly shuffle a list (using the familiar Fisher-Yates-Knuth algorithm):

List shuffle(List items) {
  var random = new Random();
  for (var i = items.length - 1; i > 0; i--) {
    var j = random.nextInt(i);
    var temp = items[i];
    items[i] = items[j];
    items[j] = temp;
  }
  return items;
}

You can use it like this:

var items = ["fee", "fi", "fo", "fum", "smell", "Englishman"];
print(shuffle(items)); // [fo, smell, fum, Englishman, fee, fi]

nextDouble()

generates a random floating point value distributed between 0.0 and 1.0. Here is a little function to simulate a biased coin toss; the percent argument alters the percent a coin will return heads (‘H’). This is pretty much cribbed from this discussion on Stack Overflow:

String flip(num percent) {
  Random random = new Random();
  return random.nextDouble() < percent ? 'H' : 'T';
}

And here is some code to test that it works:

int n = 1000;
int heads = 0;
for (var i = 0; i < 1000; i++) {
  if(flip(.20) == "H") heads++;
}
print(heads/n); // 0.209, 0.196, etc.

Running Only Some of Your Dart Tests With filterTests()

| Comments

The Dart unittest library allows you to run just a single test; to do so, just change the call for that test form test() to solo_test().

Another way to run a subset of your tests is by using the filterTests() function. filterTests() takes a String or a RegExp argument and matches it against each test description; if the description matches, the test runs, otherwise, it doesn’t.

Before you use filterTests(), you need to disable the automatic running of tests (set autoStart to false) and ensure that the your configuration is initialized.

You can do this by creating a custom configuration:

import "package:unittest/unittest.dart";
import "package:args/args.dart";

class FilterTests extends Configuration {
  get autoStart => false;
}

void useFilteredTests() {
  configure(new FilterTests());
  ensureInitialized();  
}

Then, you can call useFilteredTests() in your main(), define all your tests, call filteredTests() with a string or regexp argument and run your tests using runTests():

void main() {
  useFilteredTests();

  // your tests go here

  filterTests(some_string_or_regexp);
  runTests();
}

Here is a little working example:

void main() {
  useFilteredTests();

  test("one test", () {
    expect(1, equals(1));
  }); 

  test("another test", () {
    expect(2, equals(2));
  });

  test("and another", () {
    expect(3, equals(3));
  });

  filterTests('test');
  // filterTests('another');

  runTests();
}

filterTests('test') will run the first 2 tests; filterTests('another') will run the last 2 tests.

It is easy to make this considerably more useful by getting the argument to filterTests() from the command line. That way, you can control what subset of tests to run without having to change the code in your test suite. Here is a slightly expanded version of the same example:

void main() {
  useFilteredTests();
  ArgParser argParser = new ArgParser();
  Options options = new Options();
  ArgResults results = argParser.parse(options.arguments);
  List<String> args = results.rest; // get the args from the command line

  test("one test", (){
    expect(1, equals(1));
  }); 

  test("another test", (){
    expect(2, equals(2));
  });

  test("and another", (){
    expect(3, equals(3));
  });

  // we add a group() to show how we can easily run just the tests
  // contained in it
  group("foo", () {
    test("this", (){
      expect('bar', equals('bar'));
    }); 

    test("that", (){
      expect('baz', equals('baz'));
    });
  });

  if (!args.isEmpty) {
    filterTests(args[0]);
  }
  runTests();
}

You can run the tests from the command line by using the

`dart name_of_file.dart [keyword]`

syntax. If the keyword is this, only one test will run. If the keyword is foo, all tests in the group() with the description of foo will run. If you do not provide a keyword, all 5 tests will run.

Dart: Customizing Unittest Run Output

| Comments

unittest provides a default configuration that determines the content and appearance of the output from running your tests. In addition, the package provides fancier configurations for running tests in the browser, or on the VM.

But suppose you want to customize the test run output? Maybe you are an ardent Test Driven Development (TDD) hacker, and want to have your test output be in sync with TDD Red-Green-Refactor workflow (passing tests in green, failing tests in red); maybe you want a green “.” printed to the command line for every passing test (you don’t care for all the “PASS: …” messages that the default configuration gives you), and a red ‘F’ printed for every failing test, with more details about the failures in the summary. You also want the ouput to list the file where the tests being run are located and you want to know how long it takes to run all your tests.

To do all this, you need to extend the default Configuration class (see unittest/src/config.dart) and customize your environment by passing an instance of that class to configure() as an argument. A Configuration has several functions that get called at different stages of the testing process:

onInit(), when the test framework is initialized
onStart(), before the first test is run
onTestStart(), when a test starts running
onTestResult(), upon the completion of each test
onDone(), when all tests are done

and you can override all of these.

Let’s extend Configuration and begin by adding a few constants to help with the presentation:

class ColorTestRunner extends Configuration {
  const String NEUTRAL_COLOR = "\u001b[33;34m"; // blue
  const String PASS_COLOR = "\u001b[33;32m";    // green
  const String FAIL_COLOR = "\u001b[33;31m";    // red
  const String RESET_COLOR = "\u001b[33;0m";

  ...
}

We will prefix our failing output with FAIL_COLOR, passing output with PASS_COLOR and use RESET_COLOR to revert back to the user’s settings. We will use NEUTRAL_COLOR to print a small introduction and the summary.

We are now ready to start filling out our ColorTestRunner class. The onInit() of Configuration is empty; let’s add a little introduction that prints the name of the file containing the tests:

void onInit() { 
  print(NEUTRAL_COLOR);
  Options options = new Options();  
  print("Running tests for ${options.script}");
  print(RESET_COLOR);
}

Now let’s move on to onStart(). This is called after onInit() but before the first test is run. In the default Configuration, this prints the unittest-suite-wait-for-done message. We pushed our custom message in the onInit(), so we don’t need another message here. But this would be a good place to start running the stopwatch for timing our tests:

Stopwatch stopwatch = new Stopwatch();
void onStart() => stopwatch.start();

Configuration defines the twin onTestStart() and onTestResult() functions that basically define which test is currently being run:

void onTestStart(TestCase testCase) {
  currentTestCase = testCase;
}

void onTestResult(TestCase testCase) {
  currentTestCase = null;
}

We don’t need to tinker with onTestRun(), but we’ll override onTestResult() to output the green . or red F for passing and failing tests, respectively:

void onTestResult(TestCase testCase) {
  var color = testCase.result == PASS ? PASS_COLOR : FAIL_COLOR;
  stdout.writeString("${color}${testCase.result == PASS ? '.' : 'F'}$RESET_COLOR");
  currentTestCase = null;
}

The onDone() function is where Configuration does the heavy lifting: it outputs the status and description of each test as well as the error messages and stack traces for failing tests. Then, it provides summary informtion for the test run. We’ll just skip over the passing tests and color-code our summary (it will be red if even a single test fails). Then, we will output the total time taken for the tests to run (remember the stopwatch we started in onStart()?.

With a little bit of refactoring, and some additional formatting added to the output, here is what the script looks like:

library colorTestRunner;

import 'package:unittest/unittest.dart';
import 'dart:io';

/// Overrides default Configuration to provide colorful command line
/// output when tests are run. Loosely based on RSpec (https://www.relishapp.com/rspec).
/// Outputs green (passing) "." and red (failing) "F" characters as tests are running. 
/// If there are failing tests, provides detailed error report in red.
/// Provides a short summary.
class ColorTestRunner extends Configuration {
  const String NEUTRAL_COLOR = "\u001b[33;34m"; // blue
  const String PASS_COLOR = "\u001b[33;32m";    // green
  const String FAIL_COLOR = "\u001b[33;31m";    // red
  const String RESET_COLOR = "\u001b[33;0m";
  const int BORDER_LENGTH = 80;

  Stopwatch stopwatch = new Stopwatch();

  void onInit() => _printResultHeader();
  void onStart() => stopwatch.start();

  void onTestResult(TestCase testCase) {
    var color = testCase.result == PASS ? PASS_COLOR : FAIL_COLOR;
    _colorPrint(color, testCase);
    currentTestCase = null;
  }

  void onDone(int passed, int failed, int errors, List<TestCase> testCases,
              String uncaughtError) {
    stopwatch.stop();

    _printFailingTestInfo(testCases);
    _printSummary(passed, failed, errors, uncaughtError);
    print("${NEUTRAL_COLOR}Total time = ${stopwatch.elapsedMilliseconds / 1000} seconds.$RESET_COLOR");
  }

  void _printFailingTestInfo(List<TestCase> testCases) {
    print(FAIL_COLOR);
    for (var testCase in testCases) {
      if (testCase.result != PASS) {
        print("${testCase.result.toUpperCase()}: ${testCase.description}");

        if (testCase.message != '') {
          print(testCase.message);
        }

        if (testCase.stackTrace != null && testCase.stackTrace != '') {
          print(testCase.stackTrace);
        }

        print(_repeatString(".", BORDER_LENGTH));
      }
    }
    print(RESET_COLOR);
  }

  void _printSummary(int passed, int failed, int errors, String uncaughtError) {
    if (_passed(failed, errors, uncaughtError)) {
      print(PASS_COLOR); 
      print("All $passed tests passed.");
    } else {
      print(FAIL_COLOR); 
      if (_noTestsFound(passed, failed, errors)) {
        print('No tests found.');
      } else if (uncaughtError != null) {
        print("Top-level uncaught error: $uncaughtError");
      } else {
        print("$passed PASSED, $failed FAILED, $errors ERRORS.");
      }
    }
  }

  bool _noTestsFound(int passed, int failed, int errors) {
    return passed == 0 && failed == 0 && errors == 0;
  }

  bool _passed(int failed, int errors, String uncaughtError) {
    return failed == 0 && errors == 0 && uncaughtError == null;
  }

  void _printResultHeader() {
    print(NEUTRAL_COLOR);
    Options options = new Options();  
    String description = "Running tests for ${options.script}";
    String frame = _repeatString("=", description.length);
    print(frame);
    print(description);
    print(frame);
    print(RESET_COLOR);
  }

  String _repeatString(String str, int times) {
    StringBuffer sb = new StringBuffer();
    for (var i = 0; i < times; i++) {
      sb.add(str);  
    }
    return sb.toString();
  }

  void _colorPrint(String color, TestCase testCase) {
    stdout.writeString("${color}${testCase.result == PASS ? '.' : 'F'}$RESET_COLOR");
  }
}

/// The function that should be called right before the tests.
void useColorTestRunner() {
  configure(new ColorTestRunner());
}

To use this script, call the useColorTestRunner() just before where you have defined your tests. Here is a simple use case:

import 'package:unittest/unittest.dart';
import '<path to>/color_test_runner.dart';

num factorial(num n) {
  if (n < 2) {
    return 1;
  } else {
    return n * factorial(n - 1);
  }
}

void main() {
  useColorTestRunner(); // we're using our own configuration

  test("when n is 0", () {   
    expect(factorial(0), equals(1));
  });

  test("when n is 1", () {
    expect(factorial(1), equals(1));
  });

  test("when n is > 1", () {
    expect(factorial(5), equals(120));
  });
}

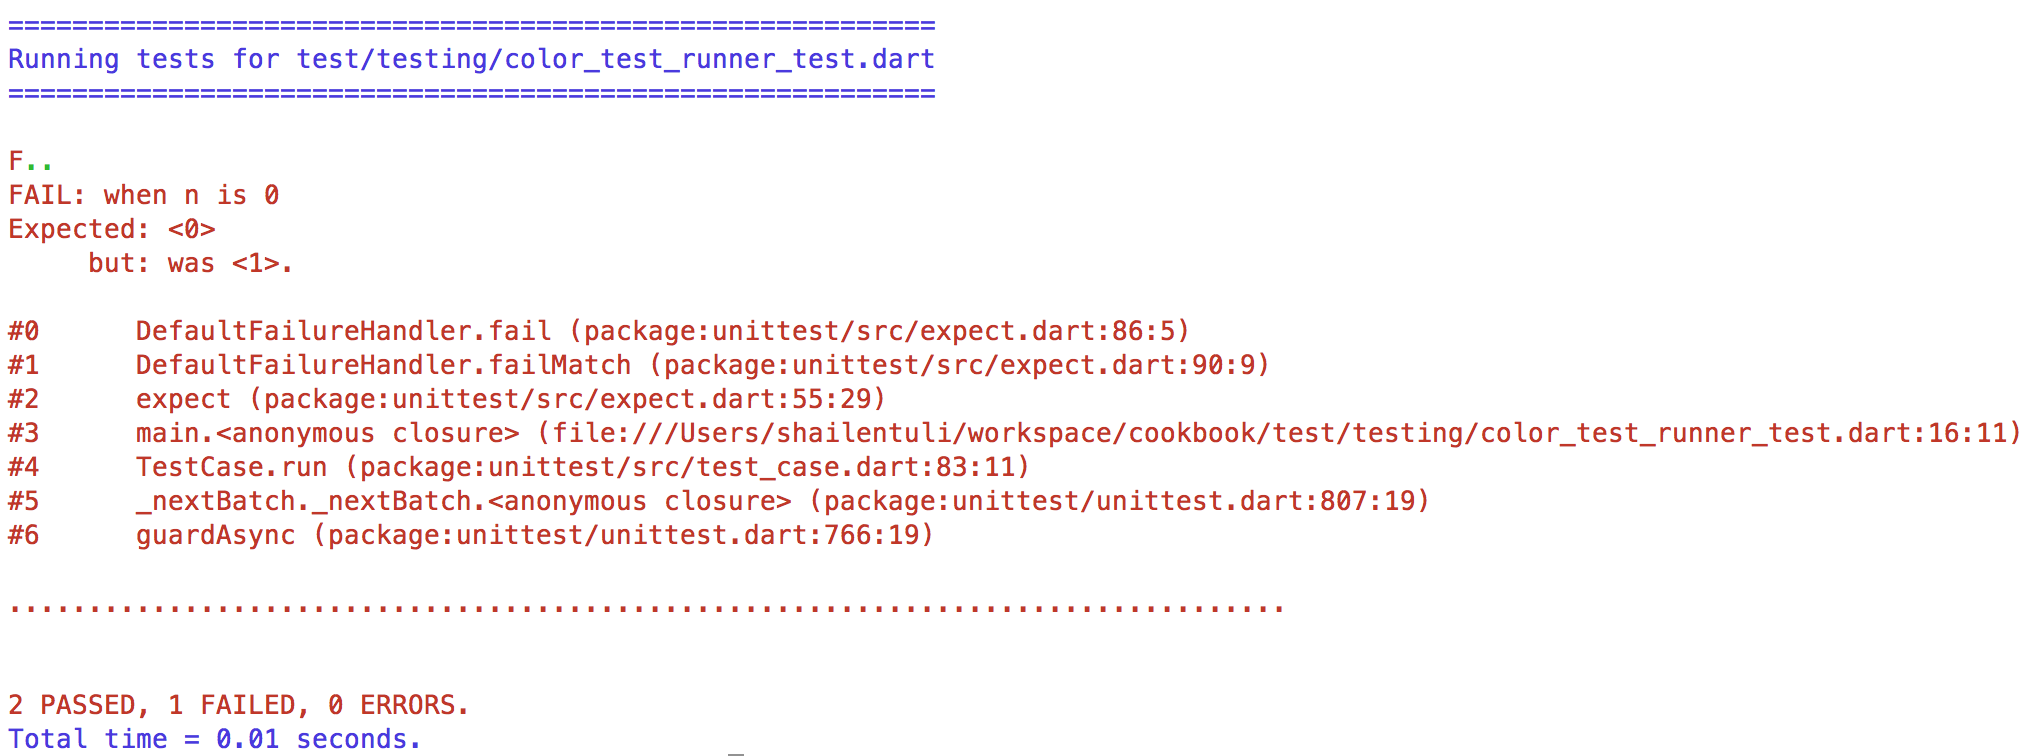
Call this from the command line: dart <test file>.dart and your output should look like this:

Everything is green. Great! But perhaps you were in a hurry and got your 0 and 1 mixed up in the first test:

test("when n is 0", () {   
  expect(factorial(1), equals(0)); // oops....!
});

If you run the tests now, you’ll see:

Using setUp() in Your Dart Tests

| Comments

Take this minimal Point class:

class Point {
  num x;
  num y;
  Point(this.x, this.y);

  num distanceTo(Point other) {
    ...
  }
}

As you write tests for Point, you will probably want to set up one or more point objects that you can access in each test. Something like:

void main() {
  group("Point", (){
    setUp((){
      Point p1 = new Point(3, 4);
      Point p2 = new Point(3, 5);
    });
    test("distanceTo()", (){
      expect(p1.distanceTo(p2), equals(...));
    });
  });
}

Do this and the Editor starts complaining that it cannot make sense of p1 or p2. Why? Remember, setUp() simply calls the function passed to it before each test() and our code defining p1 and p2 will therefore run every time. But (and this seems like a Captain Obvious mement) because p1 and p2 are local to function called by setUp(), they cannot be accessed from outside that function. But it takes only very small changes to take care of the access problem:

void main() {
  group("Point", (){
    Point p1;
    Point p2;
    setUp((){
      p1 = new Point(3, 4);
      p2 = new Point(3, 5);
    });
    test("distanceTo()", (){
      expect(p1.distanceTo(p2), equals(34));
    });
  });
});

Now, the function called by setUp() assigns a value to the already existing p1 and p2.

Grouping Dart Tests

| Comments

Yesterday, we create a simple Dart package with a range library and wrote a couple of tests. Let’s pick up where we left off and add more tests.

We should test that the list returned by range() does not include stop and that an ArgumentError is raised when start >= stop. Modify your range_test.dart file so that it contains the new tests:

import 'package:unittest/unittest.dart';
import 'package:range/range.dart';

void main() {
  test("range() produces a list that starts at `start`", () {
    expect(range(0, 4)[0], equals(0));
  });

  test ("range() produces a list that stops before `stop`", () {
    expect(range(0, 4).last, equals(3));
  });

  test("range() throws an exception when start > stop", () {
    expect(() => range(5, 2), throwsA(new isInstanceOf<ArgumentError>()));
  });

  test("range() throws an exception when start == stop", () {
    expect(() => range(5, 5), throwsA(new isInstanceOf<ArgumentError>()));
  });
}

Run the tests again. They should all pass. We have doubled our test coverage!

Now, what we have here works fine, but we can improve things a bit. Notice the repetition in the string arguments we pass to each test() (“range() produces …”, “range() throws …”, etc.)? We should clean that up. Also, we have 4 tests that fall into 2 natural groups: the first two call range() with valid arguments and the last two with invalid arguments. We should arrange our tests more clearly to reflect this grouping. Finally, there are no tests for the optional step argument. We should add those. Rewriting our tests, we get:

import 'package:unittest/unittest.dart';
import 'package:range/range.dart';

void main() {
  group("range()", () {
    group("produces a list that", () {
      test("starts at `start`", () {
        expect(range(0, 4)[0], equals(0));
      });

      test ("stops before `stop`", () {
        expect(range(0, 4).last, equals(3));
      });

      test("has consecutive values if no `step` is given", () {
        expect(range(1, 6), equals([1, 2, 3, 4, 5]));
      });

      test("has non-consecutive values with `step` > 1", () {
        expect(range(1, 6, 2), equals([1, 3, 5]));
      });
    });

    group("throws an exception when", () {
      test("start > stop", () {
        expect(() => range(5, 2), throwsA(new isInstanceOf<ArgumentError>()));
      });

      test("start == stop", () {
        expect(() => range(5, 5), throwsA(new isInstanceOf<ArgumentError>()));
      });
    });
  });
}

Much better. We use nested group()s to organize our tests; we pass descriptive string args to each group() to make our intent clear; we get rid of a lot of repetition.

Let’s run our tests again:

unittest-suite-wait-for-done
PASS: range() produces a list that starts at `start`
PASS: range() produces a list that stops before `stop`
PASS: range() produces a list that has consecutive values if no `step` is given
PASS: range() produces a list that has non-consecutive values with `step` > 1
PASS: range() throws an exception when start > stop
PASS: range() throws an exception when start == stop

All 6 tests passed.
unittest-suite-success

Writing Unit Tests for Pub Packages

| Comments

In this post I’m going to show you how to create a really simple Dart package. Because we would never want to write a package without testing the code in it, I will also introduce you to Dart’s quite excellent unittest framework.

Pub is Dart’s package mananger. After working through this post, you will be able to bundle your Dart libraries and share them with others on Pub.

For the purposes of this post, our package will be very basic and consist of a singe range() function modeled roughly on the Python builtin function with the same name.

range() will have the following signature:

List<num> range(num start, num stop, [num step = 1]);

It will return a list of ints between start and stop separated by step steps. Here is some sample usage:

range(0, 4);    // [0, 1, 2, 3]
range(1, 6, 2); // [1, 3, 5]

Let’s get started.

Create a simple package

Open up Dart Editor and create a New application called range. For this example, we will not be creating a web project, so uncheck Generate content for a basic web app when you create the application. But do make sure that Add Pub support is checked.

Delete the automatically created bin directory. We won’t be needing it.

Create a top level lib directory. Inside lib, create a range.dart file: the code for range() will go in here.

There are other directories and files that you should create - a README, a LICENSE, a doc/ folder for documentation, an example/ folder with examples showing usage of your package, etc. - but our focus here is on how to write unittests, so we’ll skip over those files and directories for now. To know what else you should be doing to make this a respectable package, see this excellent writeup on package layout conventions on the pub site.

Add unittest package to your library

With the basic files created for our package, let’s open up pubspec.yaml and add some metadata for our pub package (read more about Pubspec format). Every package must contain a pubspec.yaml; in fact, it is this file that makes it a package.

Add a simple description for the package and specify its only dependency, the unittest package. Your pubspec.yaml should look like this:

name:  range
description:  An approximate implementation of the range() function in Python.

dependencies:
  unittest: { sdk: unittest }

Run pub install (you can find it under Tools in the Editor). This will create a pubspec.lock file and a bunch of symlinks that are all necessary for the plumbing to work correctly; fortunately, Dart handles all these details for us.

Write some code

Let’s create a bare-bones implementation for range(). Add the following code to lib/range.dart:

library range; 

List<int> range(int start, int stop, [int step=1]) {
  if (start >= stop) {
    throw new ArgumentError("start must be less than stop");
  }

  List<int> list = [];

  for (var i = start; i < stop; i+= step) {
    list.add(i);
  }

  return list;
}

Write some tests

Create a top level test directory. Inside test, create a range_test.dart file: your tests will go in here. But before we can write our tests, test/range_test.dart needs access to the unittest package and the range library. At the top of range_test.dart, add these import statements:

import 'package:unittest/unittest.dart';
import 'package:range/range.dart';

Now add a couple of tests (we’ll need many more to really test range(), but these will do for now). Your range_test.dart should look like this:

import 'package:unittest/unittest.dart';
import 'package:range/range.dart';

void main() {
  test("range() produces a list that starts at `start`", () {
    expect(range(0, 4)[0], equals(0));
  });

  test("range() throws an exception when start > stop", () {
    expect(() => range(5, 2), throwsA(new isInstanceOf<ArgumentError>()));
  });      
}

An individual test goes inside test(). expect() evaluates the equality between the expected and actual values. A string argument to test() describes the purpose of the test.

Run the tests (press the green arrow in the Editor; or, press CMD-R if you are using a Mac; or, type dart test/range_test.dart on the command line). Watch the output produced by the editor:

unittest-suite-wait-for-done
PASS: range() produces a list that starts at `start`
PASS: range() throws an exception when start > stop

All 2 tests passed.
unittest-suite-success

Summary

So, we managed to create a minimal Dart package, made it (barely) good enough to put on pub, and wrote a few tests. This is a good start, of course, but we have only scratched the surface of how we should test our packages. For a very thorough explanation of how the unittest framework works in Dart, I would highly recommend a careful reading of Unit Testing with Dart by Google engineer Graham Wheeler. He goes into considerable details about writing tests, defining setUp() and tearDown(), running asynchronous tests, using and creating matchers, and configuring your test environment.

Using Boolean Expressions for Assignment in Dart

| Comments

I often use boolean evaluation in Javascript for assignment:

var Point = function(options) {
  options = options || {};
  this.x = options['x'] || 0;
  this.y = options['y'] || 0;
}

And in Ruby, it is idiomatic to do something like this:

age ||= 16; // if age is `nil` or `false`, assign it a value of 16

or, this:

a, b, c = 1, 2, 3
d = a && b && c
// d gets the value of c, 3

In each case, the boolean expressions return the value of the last evaluation. Can I do something similar in Dart? Is this code legal?

var x; // x is null
var y = x || 10;

In checked mode, no; in unchecked mode, this works, but the result may surprise you.

Based on other languages I have used, I would expect y to equal 10. In Dart, this does not happen and y gets assigned a value of false. Why? Since 10 is not explicitly true, it evaluates to false. All things that are not explicitly true in Dart, are false (see my post from yesterday if this isn’t clear).

Now, in checked mode (you are using checked mode, right?), y doesn’t get a value at all because we get an error:

Unhandled exception:
type 'Null' is not a subtype of type 'bool' of 'boolean expression'.

This is Dart’s way of telling us that it is not going to do implicit boolean conversion for us when using || and it expects to see a boolean where it now sees a null (x is null). Changing the code to:

var y = 5 || 10;

we get a slightly different error message:

Unhandled exception:
type 'int' is not a subtype of type 'bool' of 'boolean expression'.

No good. Dart wants booleans around the ||. This works fine, but it isn’t what we are looking for:

int x = 10;
bool y = x % 3 == 1 || x % 5 == 2;
// y is true

So, is there a correct way to handle assignment based on boolean evaluation? Yes. Don’t rely on || or && to implicitly handle this for you; instead, explicitly check for truthyness yourself:

int y = x == null ? 0 : x;

If x is null, y will be 0; else, it will have the value of x. Quite clear and readable.

Boolean based assignment is common in JavaScript because there we don’t have as rich an understanding of keyword arguments and default values as Dart has. In Dart, we can do this:

myFunction({x: 0, y: 0}) {
  ...
}

If you need to check whether a parameter was passed a value or not, you can easily do so:

myFunction([x=0]) {
  if (?x) {
    ...
  }
}

The lessons of all this? Use checked mode. Don’t rely on Dart’s boolean expressions to magically return boolean values; if such values are needed, obtain them directly yourself. Be explicit. Use default arguemnts in functions and methods. Use ? to check if a parameter was passed.

Booleans in Dart

| Comments

We’ve all written code that looks something like this:

if (x) {
  // do something
} else {
  // do something else
}

In Javascript, the if (x) would evaluate to false if x was false, null, undefined, the number 0 (or 0.0), an '' or NaN (these are all falsey in Javascript); otherwise it would evaluate to true.

If this code were rewritten in Python, the if (x) would evaluate to false if x was None, false, zero (0, 0.0, 0L, etc.), an empty string (''), list ([]), tuple (()) or dict({}); otherwise it would evaluate to true.

So, what are the truthy and falsey lists for Dart? To answer that, let’s look at what the language spec says about booleans:

Boolean conversion maps any object o into a boolean. Boolean conversion is defined  by the function
  (bool v){
    assert(v != null);
    return identical(v, true);
  }(o)

In other words, anything that is not explicitly true, is false in Dart. So, in our example, if if (x) would evaluate to true if and only if x equalled the the boolean literal true (or an expression that evaluated to true (3 % 2 == 1, say)),; otherwise it would evaluate to false.

This is very simple. There are no truthy/falsey lists to memorize; it is all very clear, quite correct and ….

likely to get you quickly into trouble. Wait, what?

This is legal Dart code, right? Well, that depends if you are in checked mode or not. In unchecked mode, the code works exactly as described above. However, in checked mode, any if (x) type constructs will generate an exception unless x is a boolean. Let’s look at that function from the language spec again:

(bool v) {

}

In checked mode, v must be a bool. If it isn’t, the Dart editor will complain and throw an exception. We will never get to the stage of figuring out whether our if (x) evaluates to true or false.

Going back to other languages for a moment: I always felt that Javascript and Python had too many falsey values. I liked that in Ruby, only false and nil evaluated to false; everything else was true. So, instead of writing if myList ..., you would write if myList.empty? .. in Ruby, making your intent quite clear. Dart actually goes beyond Ruby in this regard and really simplifies things: false (and boolean expressions that return false) are false; true (and boolean expressions that return true) are true. Everything else is neither false nor true.

So, as a programmer, how should you handle the reality that the Dart’s boolean semantics change based on whether you are in checked or unchecked mode? My recommendation: always code in checked mode and be quite explicit about boolean expressions.

Avoid code like this (you will get an exception in checked mode):

String s = '';
if (s) {...}

This can be rewritten more clearly:

if (s.isEmpty) {...}

The following:

List myList = [1, 2, 3];
if(myList.indexOf(1)) {...}

should become:

if (myList.indexOf(1) != 0) {...}

and this:

int num;
if (num) {...}

is better written as:

if (num == null) {...}

The real take home lesson is a) listen to the static warnings b) only use booleans for boolean operations (Do not rely on implicit boolean conversions) c) checked mode is there to stop you immediately if you do bad things during development. Dart works pretty hard to force you to do boolean stuff explicitly and there are good reasons for this. Follow the warnings from the editor and your code will be clearer, more maintainable and you will avoid a huge class of bugs.